Complete Tips For Tail Wagger Installation On Other Decoys
Installation on Carry Lite
-Remove the existing tail
-Using a hack saw (or other suitable saw) remove the knob to which the tail was attached
-On the decoy’s belly, cut a hole about 6″ round, for wagger access.

-3/4″ below the lip that exists above tail section, drill a 3/8″ hole (A).
-1″ below the first hole (A), drill a 3/8″ hole (B).

-Place the wagging mechanism inside the decoy so the tail hook rod exits through the top hole.
-Insert the 3/8″ x 2″ bolt from the rear of the decoy into the lower hole (B) and tighten snugly (but do not over tighten).

-Push the foam tail onto the tail-hook rod snugly
-You may adjust the location of the holes with a file to be certain that the rod is free of interference.
-Be sure the tail moves freely and does not touch anything when turned 45° in either direction.

Installation on Flambeau
also for Redi-Doe, Grazing, Alert
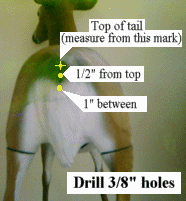
1. Place the tail in a realistic position on the decoy. Mark the top of the tail on the decoy.
2. Measure ½ inch below the top of the tail mark and make a mark.
3. Measure 1 inch below the mark you just made and make a mark.
4. Drill a 3/8″ hole at each of the two marks you have made below the top of tail mark.
5. Place the TAIL-WAGGER inside the decoy and exit the tail hook through the top hole.
6. While holding the TAIL-WAGGER, insert the 3/8″ x 2″ bolt through the bottom hole (from the outside of the decoy).
7. Tighten snugly, but do not over tighten.
8. Push the foam tail onto the rod snugly.

Installation for Full-Body Foam Decoy
When cutting on full-body foam decoy, you need a knife with a minimum blade length of 8″.
Be very careful when cutting into foam decoys
Hint: Heat the knife (or blade) with a torch until the metal is near red hot. This will make the foam very easy to cut. Be careful. Do this in a well ventilated area! Keep a fire extinguisher ready. Avoid inhaling fumes!

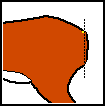
-Cut off hump on the rear of the decoy as shown, to create a flat surface. Careful, don’t destroy it.
-Place the tail in a realistic looking position.
-Mark the location at the top of the tail for the top hole you will cut in the next step.
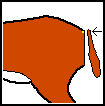
-Save removed piece (the hump), you can use it later to cover mechanism after it is inserted into the decoy.
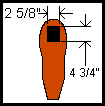
-Measure the hole as shown ( 2 5/8″ wide x 4 3/4″ high ), and cut the foam to a depth of 5″ (see next illustration ).

-Measure 5″ towards the center of the decoy from the location mark. Using your knife, cut down into the decoy to remove the foam to form a 2 5/8″ x 4 3/4″ hole which is 5″ deep.
-Take your time. (Measure twice, cut once)

-Place the wagging mechanism inside the decoy.
-The flat portions of the mechanism must be placed flush with the flat, cut portion of the decoy.
-Now, you may want to glue or caulk the cut foam piece (hump) from the first step to cover the wagging mechanism. –Cut and trim as is necessary. Note: hot glue works well on many foams.
-Make sure the tail is able to move freely without interference from the foam or cable.
-You may need to cut foam to make fitting adjustments.

-Snugly place the tail slot onto the activation rod.
-To activate the wagger mechanism, select the timing, plug in the battery pack, and turn on.
-Timing: Jumper on both pins = 8 second interval, Jumper on one pin = 16 second interval.
